How to Bake Sourdough Bread: A Step-by-Step Guide for Beginners
Baking authentic sourdough bread truly boils down to five essential elements: a vibrant, active starter; precise measurements of flour and water; ample patience during fermentation; a blistering hot, enclosed baking environment; and the critical skill of observing your dough's needs rather than blindly following a clock. Master these, and you'll soon be pulling a beautifully blistered, open-crumbed loaf from your oven. This comprehensive guide walks you through the entire process, from preparing your starter to slicing that first warm, aromatic piece, providing the detailed insights that truly matter once your hands are in the dough.
- Essential Ingredients and Equipment for Sourdough Baking
- Step 1: Activating and Preparing Your Sourdough Starter
- Step 2: Mixing the Dough and Understanding Hydration
- Step 3: Autolyse and Incorporating Salt into Your Sourdough Dough
- Step 4: Bulk Fermentation and the Power of Stretch-and-Folds
- Step 5: Expert Techniques for Shaping Your Sourdough Loaf (Boule or Batard)
- Step 6: Cold Proofing Overnight vs. Same-Day Sourdough Baking
- Step 7: Scoring Techniques for Achieving Excellent Oven Spring
- Step 8: Mastering the Bake with a Dutch Oven or Baking Stone
- How to Tell When Your Sourdough Bread Is Fully Baked
- Common Mistakes Beginners Make When Learning to Bake Sourdough Bread (and Their Solutions)
- Tips for Slicing, Storing, and Enjoying Your Fresh Sourdough Loaf
Essential Ingredients and Equipment for Sourdough Baking
You don't need a professional bakery setup to
bake sourdough bread, but a few key items will significantly improve your experience and the quality of your loaves, helping you on your journey to the complete guide to baking sourdough bread at home.
Key Ingredients:
- Active Sourdough Starter: Your starter should be mature (at least 2–3 weeks old if homemade, or well-established if inherited) and at its peak activity level.
- Bread Flour: Opt for bread flour with a 12–13% protein content (brands like King Arthur or locally milled options are excellent). While all-purpose flour can work, it typically results in a slightly flatter, denser crumb.
- Water: Use filtered or dechlorinated water, especially if your tap water is heavily treated.
- Fine Sea Salt: Crucial for flavor and gluten development. Avoid iodized table salt, which can inhibit fermentation.
Recommended Equipment:
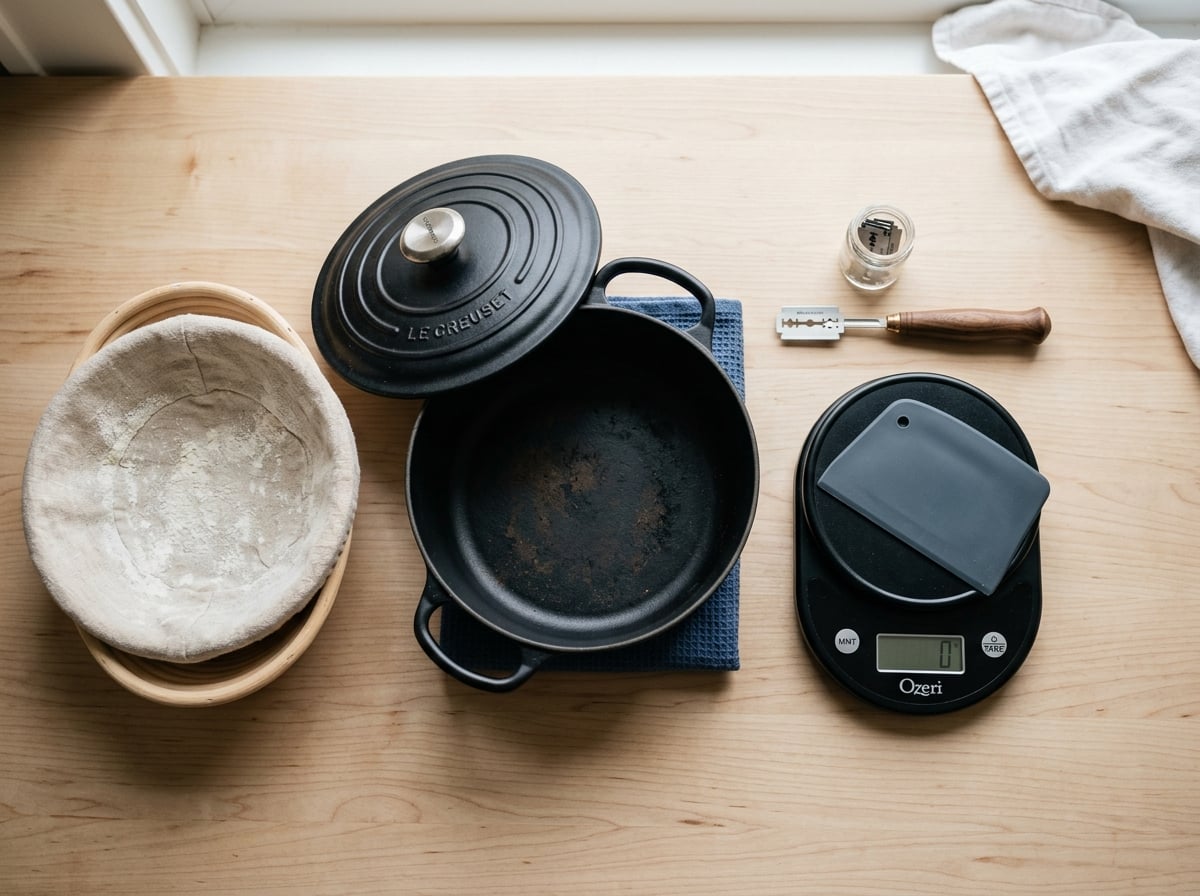
- Kitchen Scale: Absolutely non-negotiable for sourdough. Measuring by volume (cups) is too inconsistent and will lead to unpredictable results.
- Large Mixing Bowl or Dough Tub with Lid: Essential for combining ingredients and bulk fermentation.
- Bench Scraper: A metal scraper is useful for cutting dough, while a plastic one is great for handling sticky dough.
- Proofing Basket (Banneton): Or a simple bowl lined with a well-floured clean towel. This provides support during the final proof.
- Dutch Oven or Combo Cooker: Or a baking stone with an effective steam setup. An enclosed environment is critical for excellent oven spring.
- Lame or Sharp Razor Blade: For precise scoring of your dough before baking.
- Instant-Read Thermometer: Genuinely useful for consistent results, allowing you to confirm the internal doneness of your loaf.
Step 1: Activating and Preparing Your Sourdough Starter
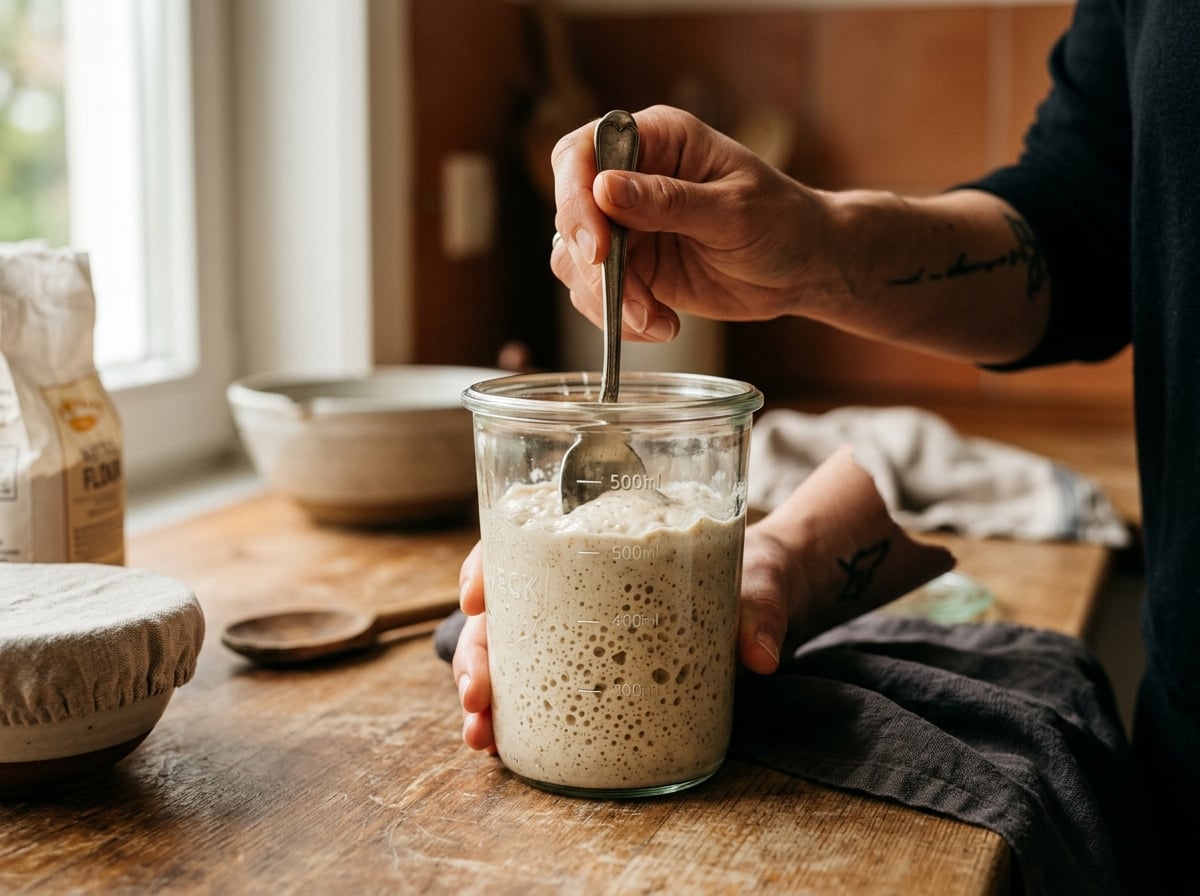
This is the foundational step, and often the one beginners rush. Your starter must be at its peak activity when you begin to mix your dough. This means it has roughly doubled in volume, shows a slightly domed top, is full of bubbles, and emits a pleasant tangy-sweet aroma rather than a sharp, acetone-like smell.
To prepare, feed your starter either the night before or the morning of your bake. A common and effective ratio is 1:1:1 by weight: equal parts starter, flour, and water. For example, 50g of starter, 50g of bread flour, and 50g of water. The time it takes for your starter to peak depends on your kitchen's temperature; typically, it's 4–8 hours. In a cooler environment (below 68°F/20°C), it might take 10–12 hours.
If you're unsure, you can perform the float test: drop a small spoonful of starter into a glass of water. If it floats, it's generally considered ready. However, don't rely on this as an absolute rule. A starter can float past its peak or fail to float and still be perfectly viable. Consistently observing its rise and fall pattern over several feedings will teach you far more about its readiness than any single test. To delve deeper into the nuances of maintaining a vigorous culture, you might find your sourdough starter guide particularly helpful. While this guide focuses on baking, understanding creating a sourdough starter from scratch is where all great loaves truly begin.
Step 2: Mixing the Dough and Understanding Hydration
Hydration refers to the weight of water as a percentage of the total flour weight. For instance, a dough with 500g of flour and 350g of water is at 70% hydration—a highly manageable level for beginners learning to
bake sourdough bread. As you push past 80%, the dough becomes slacker and stickier, requiring more advanced handling and shaping skills.
A reliable starting formula for your inaugural sourdough loaves is:
- 500g bread flour
- 350g water (70% hydration)
- 100g active sourdough starter (20% of flour weight)
- 10g fine sea salt (2%)
Begin by combining the flour, water, and active starter. Mix these ingredients until no dry flour pockets remain. The mixture will be shaggy and not smooth at this stage, but ensure it's evenly hydrated. Cover your bowl and let the mixture rest.
Step 3: Autolyse and Incorporating Salt into Your Sourdough Dough
An autolyse is a crucial resting period, typically lasting from 30 minutes to an hour, though it can extend to 4 hours for weaker flours. During this time, the flour fully hydrates, and enzymatic activity naturally begins to develop gluten, all without any mechanical kneading. Some bakers prefer a pure autolyse, mixing only flour and water before adding the starter. Others, like in the formula above, combine flour, water, and starter initially, calling this a "bulk autolyse." Both methods are effective; the pure autolyse may offer slightly better extensibility, but the difference is often too subtle for most home bakers to detect.
After the autolyse rest, sprinkle the salt evenly over the dough, adding a small splash of water (10–15g) to help it dissolve. Incorporate the salt using a gentle pinching-and-folding motion directly in the bowl. Initially, the dough may feel wet and disjointed, but continue folding for 2–3 minutes, and you'll notice it beginning to come together. Salt plays a vital role beyond just flavor; it strengthens the gluten structure and slightly regulates the fermentation rate, which is why it's added after the initial resting phase.
Step 4: Bulk Fermentation and the Power of Stretch-and-Folds
Bulk fermentation, also known as the first rise, is the period where your dough truly develops flavor and volume. This phase typically lasts 4–6 hours in a warm environment (75–78°F / 24–26°C). In cooler kitchens, this can extend to 8 hours or more. Using a proofing box or even just your oven with the light on can help maintain a consistent, warmer temperature.
Instead of traditional kneading, you'll perform a series of stretch-and-folds: wet your hand, gently grab one side of the dough, stretch it upwards, and fold it over itself. Rotate the bowl a quarter turn and repeat this action three more times to complete one set. Perform one set of stretch-and-folds every 30 minutes for the first 2 hours of bulk fermentation. After this initial period, allow the dough to rest undisturbed to complete its rise.
Throughout bulk fermentation, monitor your dough's progress. You're looking for it to increase in volume by 50–75%, feel airy and jiggly when you gently shake the bowl, and display visible bubbles on its surface and sides. While "doubling in size" is often cited, for doughs with a high percentage of whole grains or a very strong starter, 50% growth is often sufficient. Waiting for a full double can lead to over-fermentation, resulting in a slack, gummy dough that is difficult to shape and has a less desirable crumb.
Step 5: Expert Techniques for Shaping Your Sourdough Loaf (Boule or Batard)
Carefully turn your fermented dough out onto a lightly floured work surface. Begin with a rough pre-shape: gently fold the dough into a loose ball. Let it rest, uncovered, for 15–20 minutes. This resting period is crucial as it allows the gluten to relax, making the dough more cooperative during final shaping.
For a Boule (Round Loaf):
- Flip the dough seam-side up.
- Fold the edges of the dough towards the center, similar to how you would close an envelope.
- Flip the dough seam-side down.
- Using your bench scraper, gently drag the dough across the counter in small, circular motions. This action builds crucial surface tension, creating a taut outer skin.
For a Batard (Oblong Loaf):
- Gently pat the dough into a rectangular shape.
- Fold the top third of the rectangle down and the bottom third up.
- Starting from the top, tightly roll the dough downwards, creating a log shape.
- Pinch the seam closed securely along the bottom.
Regardless of the shape you choose, the primary goal is to achieve a taut, smooth outer skin. A properly shaped loaf will hold its form when gently nudged. If it's too loose, it will spread excessively in the oven, leading to a flatter loaf. If it's too tight, the skin may tear during baking, compromising your desired aesthetic and crumb structure.
Step 6: Cold Proofing Overnight vs. Same-Day Sourdough Baking
Once shaped, carefully transfer your dough, seam-side up, into a well-floured banneton (proofing basket). From here, you have two primary options for the final proofing stage:
Cold Proofing (Highly Recommended): This is the default method for many bakers due to its numerous benefits. Cover your banneton and refrigerate the dough for 12–48 hours. Cold proofing significantly deepens the sour flavor profile of your bread, firms up the dough for cleaner, more precise scoring, and offers immense scheduling flexibility – you can shape in the evening and bake the next morning. However, be mindful of going beyond 48 hours, especially with higher hydration doughs, as the dough can start to break down and lose structural integrity.
Same-Day Baking: For a faster turnaround, you can let the shaped dough proof at room temperature for 1–2 hours. The dough should become noticeably puffy and pass the "poke test": gently press a floured finger into the dough. If the indentation springs back slowly, it's ready. If it springs back instantly, it's underproofed. If it stays sunken, it's overproofed. While quicker, this method yields a milder flavor and provides a much narrower window for perfectly timing your bake, making cold proofing often easier for beginners and experts alike to bake sourdough rolls successfully.
Step 7: Scoring Techniques for Achieving Excellent Oven Spring
Once your dough has completed its final proof, turn it out onto a piece of parchment paper. Score it immediately, before it has a chance to relax and potentially stick to your blade. Cold, firm dough is much easier to score cleanly and precisely than dough at room temperature.
When scoring, hold your lame (or razor blade) at a 30–45 degree angle to the dough's surface, rather than straight down. A single, confident slash, approximately ½ inch deep, running the length of the loaf, is ideal for creating the classic "ear." Hesitant or shallow scoring is a common reason why home loaves might blow out unpredictably on the side instead of opening cleanly along the intended cut.
- For a Boule: A simple crescent shape or a cross pattern works beautifully.
- For a Batard: A single, long diagonal slash down the center is both standard and consistently reliable.
Step 8: Mastering the Bake with a Dutch Oven or Baking Stone
Before baking, preheat your Dutch oven inside your oven at 500°F (260°C) for a full 45 minutes to an hour. This extended preheat is crucial, as a sufficiently hot pot ensures even heat transfer and strong, even oven spring. A lukewarm pot will yield weak and uneven expansion.
Carefully lower the dough (still on its parchment paper) into the scorching hot Dutch oven. Place the lid on, then immediately reduce the oven temperature to 450°F (230°C). Bake covered for 20 minutes. The lid traps steam around the dough, keeping the crust pliable and allowing the loaf to expand fully before the crust sets.
After 20 minutes, remove the lid and continue baking uncovered for another 20–25 minutes. This phase develops the deep, rich color and desirable crispness of your crust. If you're using a baking stone instead of a Dutch oven, you'll need to create steam: place a metal tray with ice cubes or hot water on a lower rack when you load the bread, and mist the oven walls with a spray bottle before closing the door.
How to Tell When Your Sourdough Bread Is Fully Baked
Crust color is a good visual indicator – aim for a deep amber to almost mahogany hue, not just a pale gold. This deep coloration signifies proper caramelization, which is essential for the sourdough's complex flavor. However, the most reliable test is internal temperature: insert an instant-read thermometer into the center of the loaf. It should register between 205–210°F (96–99°C). Pulling your loaf out too early (e.g., around 190°F) will result in a gummy crumb, regardless of how good the exterior looks.
A classic secondary check is to thump the bottom crust; a hollow sound indicates doneness. However, this is quite subjective, which is why the thermometer provides a more accurate and trustworthy reading.
Common Mistakes Beginners Make When Learning to Bake Sourdough Bread (and Their Solutions)
- Weak or Immature Starter: If your dough consistently fails to rise, the problem nearly always lies with your starter, not your technique. Commit to feeding it consistently for several more days to build its strength before attempting another bake. Sometimes, the only sourdough recipe you'll ever need still needs a good starter.
- Skipping the Kitchen Scale: Measuring flour by volume (cups) can vary by as much as 20% depending on how it's packed. Always weigh all your ingredients for consistent results.
- Over-flouring During Shaping: An excessively dusty or dry work surface prevents the dough from gripping properly, making it difficult to build the necessary surface tension. Use flour sparingly – just enough to prevent sticking.
- Baking Underproofed Dough Directly from the Fridge: Even with perfect oven spring technique, cold dough that is still underproofed will result in a dense, tight crumb. Always learn and apply the poke test to confirm readiness, even after a cold proof.
- Impatient Cooling: Cutting into a hot loaf allows steam to escape too rapidly, leading to a gummy band of crumb near the crust. It's challenging, but wait at least an hour, ideally two, before slicing.
Tips for Slicing, Storing, and Enjoying Your Fresh Sourdough Loaf
Allow your freshly baked loaf to cool completely on a wire rack before slicing. I know the wait is excruciating, but the internal crumb structure continues to set for at least an hour after baking. When you're ready to slice, use a sharp, serrated bread knife with a gentle sawing motion rather than pressing down, which can crush the delicate crumb.
For storage, avoid the refrigerator entirely, as it accelerates staling faster than room temperature. For short-term storage (one to two days), keep the cut side down on a wooden board or place the loaf in a paper bag inside a bread box. For longer preservation, slice the entire loaf and freeze the slices flat in an airtight bag. When ready to enjoy, toast slices directly from frozen; thawing first can lead to a soggy crust. Your homemade sourdough loaf is excellent for making toast, croutons, or even sourdough bread bowls for your favorite soups and stews, especially as it firms up.
Leave a Reply